
New to e-commerce, or looking to expand your portfolio of websites? Whatever your level of experience, starting a Shopify store may well be the perfect route for you.

Credit: ViDI Studio – Shutterstock
If you’re keen to start making money from e-commerce, try Shopify.
As a platform, it’s used by a huge range of businesses, from small stores that people run as side hustles, to large-scale global brands such as Gymshark and Kylie Cosmetics.
We’ll talk you through the process of creating a Shopify store below, before going through ways to increase your earnings on the platform.
So if you’re interested in opening a Shopify store as a new business, sign up for the free trial and read our tips to get started.
What’s in this guide?
What is Shopify and how does it work?
Shopify hosts the online stores of millions of e-commerce businesses. It’s a paid-for service that makes it super easy to create and run your store.
After joining Shopify, you just need to follow a few quick steps to get the store ready for launch.
Once you’ve created your Shopify store, the platform simplifies the process of selling products. Their tools help you connect with audiences and make sense of your customer data, offering just about everything you need to set up a profitable online business.
How to create a Shopify store
Follow these steps to create your store on Shopify:
-
Sign up for the Shopify free trial
First things first: get the Shopify free trial.
You don’t need to give your card details to get the free trial, so there’s no financial pressure to stick with it if you decide it’s not right for you.
At the time of writing, the free trial lasts for three days. This should be enough time for you to build the store and test out the platform’s key features.
Following the trial, it costs £1 per month for three months. After that, you’ll need to pay from £25 per month to keep the store running (the price varies depending on your Shopify plan).
I got a free trial of Shopify to test it out. Here’s what I found:

This free trial was a great, low-commitment way to get a feel for Shopify.
The steps to create the store are all straightforward, and I found the tips from Shopify along the way useful.
They clearly explain what’s required at each stage and suggest things like how to optimise your product listings, so especially if you’re new to e-commerce, this is a good way to start.
On top of that, there are loads of free themes to choose from. Just scrolling through the collection of themes helped me visualise what my own online store could look like.
And at the end of the free trial, Shopify makes it very easy to either deactivate it or upgrade to a paid plan, so I can’t say I have any complaints with the process!
-
Create an account
When starting the free trial, Shopify will ask you a few quick questions about your aims for the store.
Don’t worry if you haven’t fully worked out the details of what to sell. There’s the option to answer “I’m not sure” or “I’ll decide later” to the questions, or you can skip them altogether if you’d prefer.
You’ll also need to confirm the location of your business (e.g. United Kingdom), but you don’t need to provide specific details about your name and address at this point.
Just register with your email address, Facebook, Google or Apple account and your online store will be created.
-
Add products to your Shopify store
Screenshot: Shopify
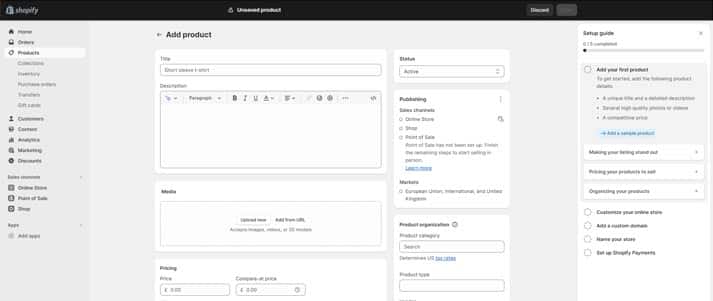
It’s easy to add products to the store:
- Start by providing the title of the product. The example they give is ‘short sleeve t-shirt’. Make sure it’s clear, concise and eye-catching.
- Add the product’s description. Shopify provides tips on optimising the listing, so keep these in mind to improve your wording.
- For the listing’s media, you can add images, videos or 3D models.
- Set the price and, if applicable, a compare-at price (such as the RRP if the product is reduced).
- Complete details about the inventory. This includes saying whether you want Shopify to track the quantity and continue selling when out of stock.
- For shipping, tick the box to indicate if the product is physical, and add its weight if so. You can also add customs info.
- If the product is available in other sizes or colours, there’s the option to add that.
- Then add a title and description that can be used in search engine listings.
- Add details to organise your products such as the category and relevant tags. If you’re unsure how to approach this, see Shopify’s suggestions on the right-hand side of the page.
-
Choose the theme of your Shopify store
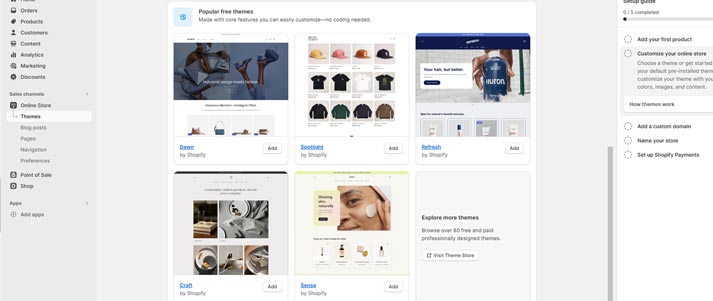
Screenshot: Shopify
Now onto the fun part: customising the theme.
There are loads of free themes to choose from. So, again, if you’re looking for zero financial commitment when first starting your online store, this is ideal. It helps you to picture how your store could look without spending any money.
-
Add your online store’s custom domain
At first, Shopify will automatically give you a domain (website address) that’s not optimised or easy to find by searching, such as one with a series of numbers and letters.
So, if you’re serious about running an online store, it will help to have your own domain.
If you already have one that you’d like to use, there’s the potential to connect that to your online store. To do this, you’ll need to follow the transfer policy of the domain provider and make sure the domain is eligible for Shopify.
However, if not, buy a new domain. One good site to get them from is GoDaddy.
-
Name your Shopify store
You’ll likely find that your store is called ‘My Store’ during your free trial, but there is of course the option to change this.
This step is easy. Just add the store name and contact number, and confirm your email address.
-
Set up payment options on Shopify
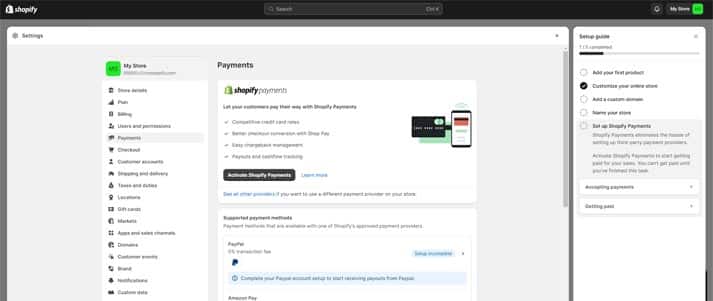
Screenshot: Shopify
By activating Shopify Payments, you’ll provide shoppers with an efficient checkout process. With this, you can accept a range of popular payment methods and sell your products in multiple currencies.
As you’d expect, there are fees involved so make sure you’re aware of them before adding Shopify Payments to your store.
You can also connect your PayPal account and activate Amazon Pay, both of which have 0% transaction fees.
If you’d like to add manual payment methods (such as if you’re happy for shoppers to choose to pay cash on delivery), there’s the option to do this.
You can also choose how payments are authorised – whether automatically at checkout, automatically when an order is fulfilled or manually.
Plus, if you’d like to install any apps to customise your payment methods, you can do this via the Shopify App Store.
-
Select a paid plan
To start selling on Shopify, you’ll need to upgrade from the free trial by selecting a paid plan (see below for prices).
Or, if you decide the platform isn’t right for you, there’s the option to deactivate the trial. It could then be worth trying one of the alternatives to Shopify such as Wix or Squarespace.
Save the Student


Average Rating